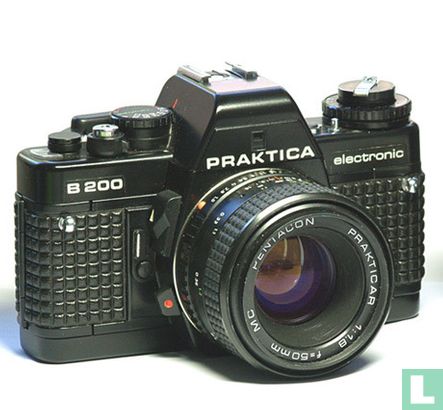
With the PRAKTICA B 200 you have acquired a high-quality compact small change single-lens reflex camera whose shutter speeds are controlled fully automatically over a range of 1/1000 s to 40 s. In addition, the camera's microelectronics makes it possible to work with fixed exposure times between 1/1000 s and 1 s and in position "B" with arbitrarily slow shutter speeds. The light metering is done by electronic transmission of the aperture value from lens to camera body at full aperture and thus with an optimally clear viewfinder image. 16 Light emitting diodes (LEDs) along the edge of the viewfinder image inform you about all important shooting data and functions, such as the expected shutter speed, limit values and fully or semi-automatic exposure control. The selected aperture is also visible at the bottom of the viewfinder image. The machine can be manually corrected for deliberate over- or under-exposure. The PRAKTICA B 200 is equipped with a PRAKTICA bayonet mount that ensures fast and reliable lens changes.
Technical properties
Automatic SLR camera with image size 24 mm x 36 mm; light metering at full aperture by electronic aperture value transmission.
Electronically controlled shutter speed continuously set between 1/1000 s and 40 s.
Can be switched from fully automatic to semi-automatic with fixed shutter speeds from 1/1000 s to 1 S.
Shutter speed indication in the viewfinder by means of light emitting diodes.
Indication for under or over exposure.
Set aperture mirrored in the bottom edge of the viewfinder image.
Automatically set aperture can be corrected manually over a range of ± 2 light values.
Exposure memory.
Focus on Fresnel lens with new type of triple adjustment wedge, micro grid and focusing screen.
Viewfinder image dimensions: 95% of the image size.
Synchronization time electron flash 1/90 s (mechanically controlled).
PRAKTICA bayonet mount (support size 44.4 mm; inner size 48 mm).
Connection for motor drive.
Memo holder on camera back.
Battery test in the viewfinder.
Power source 6V silver oxide battery (eg Mallory PX 28).
Gallium-Arsenide-Phosphide photodiode as a light sensitive cell.
Metering range: 0 - 17 EV at 21 DIN and aperture 1.4.
Camera body dimensions: 138mm x 87.5mm x 49mm.
Weight (body without battery): 530 g.
Self-timer (delay approx. 8 s) with clamping lever.
Names of the parts
1 Film sensitivity setting ring
2 Rewind button
3 Rewind lever
4 Window for mirroring the aperture value
5 Film advance lever
6 Image counter
7 Depth of field control lever
8 Self-timer tension lever
9 Shutter release button for self-timer
10 Release button
11 Filter thread
12 Aperture ring
13 Flash contact
14 Exposure compensation setting button with setting mark
15 Release button for correction button
16 Button for battery test and for holding the light measurement value
17 Center contact
18 Hot shoe
19 Setting button fixed shutter speeds and "automatic" with setting mark
20 Shutter release
21 Connection for cable release
22 Release lock with setting mark
23 Eye for carrying strap
24 Adjustment mark for changing lenses
25 Depth of field scale
26 Spacer ring
27 Eyepiece with mount for accessories
28 Shutter
29 Film cassette compartment
30 Film take-up roller
31 Film take-up reel
32 Knurled wheel
33 Back wall
34 Lock knob for battery compartment
35 Battery compartment cover
36 Motor Drive Contacts
37 Adjustment for motor drive
38 Clutch for motor drive
39 Film rewind release button
40 Tripod thread
41 Memo holder
42 Eyepiece cover (see p. 40)
Brief instructions for automatic exposure control
These getting started instructions in no way replace the requisite knowledge of all the instructions given in this booklet regarding the use of the camera.
Insert battery
When doing so, observe the polarity signs (+) and (-) on the inside of the cover (35) of the battery compartment.
Insert film
Pull up the rewind button (2); the camera back wall now springs open.
Load the film
Set the setting dial (19) to "" or a fast, fixed shutter speed. Place 35mm cassette in the film compartment (29). Press the rewind button (2) down again. Insert the film leader sufficiently far into the slot (31) and turn the take-up reel with the knurled wheel (32) in the direction of the center of the camera until the cam wheels engage in the film perforation. Pull the film advance lever (5) all the way to the stop to check that the film is actually fed.
Close the back wall
Prepare for the recording
Pull the film advance lever in turn and press the release button until the number "1" appears in the frame counter (6).
Set the setting knob (19) back to "automatic"
Set film sensitivity
Pull the setting ring (1) up and turn so that the desired number is aligned with the setting mark.
Set desired aperture
Set the desired aperture with the aperture ring (12).
Focus
Triple adjustment wedge: The camera is in focus when the contours and lines of the subject appear naturally.
Micro grid: The correct image sharpness is achieved when the image is clear and free from light glare.
Matte area: Used in low light (e.g. close-up shots): the image should be clear and sharp.
Releasing the shutter
The machine is switched on by lightly pressing the shutter release button (20); light-emitting diodes indicate the shutter speed. If the shutter speed matches the subject, the shutter release can be released; if not, a different aperture must be selected.
Change film
Press the release button (39), fold out the rewind lever (3) and turn in the direction of the arrow until the resistance is released. This indicates the end of the movie has been reached. Pull out the rewind button (2) completely (the back wall opens) and remove the film cassette from the camera.
Change lens
Press the release button (10) and turn the lens anti-clockwise as far as it will go and remove it from the mount. Press the other lens against the camera body so that the red marks line up, and turn clockwise until it clicks into place.
Insert battery
A silver oxide battery - Mallory PX 28 or a similar type - with a nominal voltage of 6 V is used to power the exposure meter, computer control and light emitting diodes. A new battery lasts approx. 2 years with normal use. To insert the battery, turn the locking knob (34) of the battery compartment cover (35) counterclockwise until the cover can be opened. Wipe contacts in the battery compartment and the new battery with a dry cloth. Place the battery with the positive pole against the contact spring (note the polarity signs on the inside of the cover) and allow it to tilt into the battery compartment. Press the lid closed and close with the locking button.
Battery test
The shutter must be cocked. Press the shutter release button (20) and battery test button (16). If the light-emitting diodes are clearly visible, the battery still has sufficient voltage. When the battery is exhausted, the LEDs light up almost or not at all. No battery test is possible in "B" and flash recording "" mode.
Particular attention should be paid to the battery and the associated contact points. These should be checked regularly and cleaned if necessary. The battery is sensitive to very low temperatures and must be protected against this if necessary. If the camera will not be used for an extended period of time, remove the battery.
Insert film
Pay attention! Before the film is placed in the camera, the shutter speed dial (19) must be set to flash recording "" (approx. 1/90 s) because long exposure times can occur in "automatic" mode. The transport lever cannot be pulled until the shutter is released. Do not force anything. If necessary, a slow shutter speed can be canceled by switching from "automatic" to "B".
Open the back wall
Pull the backwash button (2) out completely so that the back wall pops open. Unfold the back panel completely, the image counter (6) automatically jumps to zero. Place the cassette in the cassette compartment (29), press the rewind button (2) all the way in and, if necessary, turn it slightly.
Insert the leading edge of the film at least 1 cm into the slot in the film take-up reel (31). Then turn the take-up reel on the thumbwheel (32) about one full turn in the direction of the center of the camera. The teeth of the film transport roller (30) must engage in the film perforation. Check that the film is properly "caught" by the take-up reel by carefully pulling the transport lever (5).
Close the back wall
Grasp the rear wall in the middle of the clasp and press against the camera housing until the clasp audibly clicks shut.
Prepare for recording
The transport lever (5) can be set to a free position without transporting the film. This ready position ensures a better hand-fit when shooting quickly in succession. Turn the transport lever all the way to the stop, return it to the starting position and then release the shutter with the shutter release (20). Repeat the procedure until the automatic frame counter (6) shows the number "1".
Set film sensitivity
Pull up the film sensitivity setting ring (1) and turn until the desired DIN / ASA value aligns with the corresponding setting mark. When released, the ring clicks back in. As an extra reminder about the type of film inserted, you can slide the torn-off lid of the film box into the memo holder (41).
Automatic exposure control
The PRAKTICA B 200 works automatically in "automatic" mode and with a shutter speed set continuously between 1/1000 s and 40 s. The required shutter speed is determined electronically on the basis of the light conditions, the preset aperture and the film sensitivity.
Light-emitting diodes along the edge of the viewfinder image indicate the automatically selected shutter speed. Any over or under exposure is also indicated (OVER / UNDER). Because light is measured through the lens, factors that affect exposure such as focal length of the lens, filters, focal lengthening accessories, etc., are automatically taken into account.
When using lenses with PRAKTICA thread (M 42 x 1) by means of an adapter, the light is measured at working aperture.
Aperture priority
By turning the aperture ring (12), the desired aperture value is set opposite the setting mark on the lens mount. The set aperture value is displayed at the bottom of the viewfinder image. As a guideline for the aperture to be used, the following value could be used for a film with a sensitivity of 20 DIN / 80 ASA:
Diaphragm
Sun 8-11
Cloudy 4 - 5.6
Close-ups no smaller than 8
The aperture can also be determined according to the desired depth of field of the subject (foreground, intermediate range, background), whereby the shutter speed indicated in the viewfinder must be observed due to the risk of camera movement. See also the chapter "depth of field". A large aperture value produces a large depth of field, a small aperture value a correspondingly smaller depth of field.
Automatic exposure indication
Turn shutter speed dial (19) to "automatic". The electronics are switched on by lightly pressing the shutter release button (20).
In the viewfinder, the shutter speed selected by the automatic transmission can be read next to an illuminated light-emitting diode. If the shutter speed selected by the automatic mode turned out not to be in accordance with the subject, it could be corrected by selecting a different aperture value. This is for all normal times over the range of 1/1000 s. . . 8 s a light diode present; intermediate values of the stepless setting are indicated by simultaneously lighting up two adjacent diodes.
Shutter speeds between 8 s and 40 s are indicated by a steady light emitting diode next to "UNDER". Undershooting of the value 1/1000 s resp. exceeding 40 s is indicated by a flashing LED next to "OVER" or "UNDER" respectively. In these cases the shutter is always set at 1/1000 s resp. 40 s sent. The use of a tripod is recommended at shutter speeds of 1/15 s and slower.
Releasing the shutter
After checking the shutter speed in the viewfinder, the shutter can be released by further pressing the shutter release button (20). The electronics are automatically switched off when the shutter release is released. Releasing the shutter during slower shutter speeds will not affect exposure. In this case, the automatic transmission will not turn off until the shutter speed has elapsed.
If the shutter speed is to be stopped prematurely at a very slow shutter speed (for example after accidental release of the shutter), the shutter speed dial (19) can be briefly set to "B". If the eye is not behind the viewfinder with automatic exposure control (for example, when shooting from a tripod), the eyepiece cover (42) supplied with the camera must be slid onto the mount of the eyepiece (27).
Memory of the exposure automatic
Is the subject particularly high in contrast, such as
dark-clad persons in sunlit snow, or
bright subjects against a dark background,
then the exposure value must be determined by an individual light measurement at the most important picture elements from close by. The metering value obtained with this close-up measurement is remembered and the image composition can then be changed without changing the exposure.
To memorize the measurement value, the shutter release (20) is pressed lightly (light measurement) and the memory button (16) is pressed briefly (memorized measurement value). The shutter must be cocked! After that, no further measurement takes place until the shutter is released; the shutter chooses a shutter speed according to the exposure value stored in memory.
By releasing the shutter release button, which switches off the electronics, the stored measured value is deleted again.
Correction
Another option to individually influence the exposure is provided by the adjustment dial for the exposure compensation (14). Such corrections are necessary for high contrast images, for example dark objects against a light background (+1; +2) or light objects against a very dark background (-1; -2).
To do this, press the release button (15) and turn the button (14) to the desired position. Based on the basic measurement, when setting to +1 resp. +2 increased shutter speed by 1 and 2 exposure values respectively. Similarly, ar is shortened when set to -1 and -2 respectively. The correction knob is adjustable in half values. At the limits of the film sensitivity range - 12 DIN and 36 DIN - a correction with 2 steps is also possible (which then corresponds to 6 DIN or 42 DIN).
An extension of the shutter speed range beyond the values 1/1000 s and 40 s is not possible with the correction button.
Pay attention! After such a correction, the knob must be returned to its home position (O position).
Fixed shutter speeds
The PRAKTICA B 200 can be switched to fixed shutter speeds, so that you can work with fixed shutter speeds for reproduction work, technical-scientific images, etc. You then have access to fixed shutter speeds from 1 s to 1/1000 s and in position "B" over arbitrarily slow shutter speeds. The desired time can be set in advance with the shutter speed button (19).
The camera is thereby simultaneously switched to semi-automatic. As with automatic exposure, a light press on the shutter release activates the camera's electronics. Exposure control is also possible with the help of the light emitting diodes in the viewfinder. In this case, the light emitting diode corresponding to the set shutter speed flashes while another simultaneously indicates the optimum shutter speed according to the lighting conditions, film sensitivity and selected aperture by means of constant lighting. (For words in between, two adjacent light emitting diodes light up.) The camera is now set by changing the aperture or shutter speed so that the flashing light emitting diode (LED) in the viewfinder moves to the steadily lit light emitting diode, once the correct setting is reached. , to disappear entirely. When set to the flash symbol "" and "B", no LED indication is given. If a shutter speed of 1/15 s or slower is chosen, a tripod is required.
The flash time (1/90 s) is mechanically controlled, all other shutter speeds including "B", electronically controlled. I.e. Shooting without the battery in the camera is not possible, except for the flash time. However, the automatic aperture of the lenses will always work.
Hold the camera
TN The illustrations opposite show the different ways to hold the camera when shooting in vertical and horizontal format. Hold the camera steadily and firmly and rest your elbows against your body. In this way you achieve flicker-free recording.
Flash photography
The use of a flash is recommended when the available light (eg indoors) is insufficient to be able to photograph safely and from the dog or when the subject needs extra "brightening". All types of electronic flashes can be used. Slide the flash into the hot shoe (18), the electrical connection is automatically established (center contact).
Flash units without center contact are connected to the flash contact (13) at the front of the camera sleeve. The simultaneous use of two flash units is possible because the two connections (center contact and flash contact) are completely electronically separated from each other. For electronic flash units, set the shutter speed dial (19) to "". The required shutter speed (approx. 1/90 s) is reached by mechanical means. Shutter speeds can also be set slower than 1/125 s.
The aperture setting depends on the guide number (for a given film sensitivity) of your flash and the distance.
Changing the lenses
Press the release button (10) and turn the lens anti-clockwise as far as the stop. Remove the lens from the camera.
Place the lens in the camera so that the red markings (24/10) on the lens and camera are opposite each other.
Press the lens against the camera body and turn it clockwise until the lock engages audibly.
With the help of the PRAKTICA adapter, all original PRAKTICA lenses with M 42 x 1 thread can be used. Lenses from other manufacturers with M 42 x 1 screw thread must be suitable for PRAKTICA cameras and for measurement at working aperture. The PRAKTICA B 200 also works fully automatic in combination with threaded lenses without any restrictions. Only the light metering takes place at working aperture.
Focus
Focusing is possible on a triple adjustment wedge, a micro grid or the focusing screen.
Triple adjustment wedge (1)
The image sharpness can be set very precisely with this adjustment wedge. The image is optimally sharp when contours and lines follow their natural course. In case of blur, a clear shift is visible.
Micro grid (2)
The correct image sharpness is set when the image within this grid is clear, calm and without glare.
Frosted glass (3)
Particularly beneficial for loupe and micro pictures as well as for lenses with relatively low brightness (aperture value greater than 4). The image should appear bright and clear on the frosted glass.
Depth of field scale
The limits of the depth of field at the different aperture values can be read from the depth of field scale (25) of the lens:
Example:
Distance: 3 m
Aperture Number: 8
Depth of field: ranges from approx. 2m to 5m
Infrared recordings
For infrared images, a small correction of the focus is necessary, turn the distance value found during focusing opposite the infrared setting mark (see arrow) on the lens.
Depth of field control
Depth of field can also be judged in the viewfinder. To do this, the depth-of-field control button is moved upwards. Metering should not be carried out or the shutter released, as otherwise incorrect exposure may occur.
Relaxer
The shutter release (20) contains several functions for easy operation. The electronics are switched on by slightly pressing the shutter release button up to the pressure point. Pressing the shutter release button further releases the shutter. To prevent unnecessary power consumption by accidentally switching on the electronics and inadvertently releasing the shutter, it is a good idea to lock the shutter before storing the camera in the ready or combi bag.
Locking the shutter release
It can be locked by turning the ring (22) fitted around the release button clockwise. To release the shutter release, the ring is turned counterclockwise.
Pay attention! Never lock the shutter in the depressed state.
Self timer
Tension the shutter, turn the clamping lever (8) of the self-timer down to the stop and start the self-timer by pressing the shutter release button (9) in the pivot point of the lever. Running time approx. 8 s.
Do not cock the shutter while the self-timer expires! In automatic operation, cover the eyepiece with the eyepiece cover to prevent incorrect light measurement.
Change film
The frame counter (6) indicates the number of exposed frames in the film. If the film has been exposed according to the number of frames in the film (red marks at 20 or 36), the film must be changed.
Press the release button (39) until it clicks into place. Fold out the rewind lever (3) to turn, not too quickly, in the direction of the arrow (clockwise) until the increasing resistance followed by very light turning of the lever indicates the end of the film.
Pull the rewind button all the way out. The back wall will now click open. Remove the film cassette from the camera. Never change films in direct sunlight.
Pay attention! If more pictures have been taken on the film than indicated on the packaging, it is possible that the transport lever could no longer be folded out completely. Do not force anything else, but rewind the film.
Maintenance of the camera
Never use organic solvents such as spirit paint thinner, etc. to clean the camera. You should protect the camera against impact, dust and dirt. Clean the film compartment, film channel and back wall from time to time with a soft brush. In particular, do not press against the shutter blades or touch the shutter blades with your fingers. Only in extreme cases dust the mirror very carefully with a brush. In the range of 40 ° C to -10 ° C the camera works without problems. Outside this range, deviations can occur for various reasons in the mechanical and electrical / electronic functions.
Sudden temperature changes can cause condensation to form, which in turn can lead to corrosion damage.
We request that you carefully follow all instructions given in this manual. Improper use of the camera could lead to malfunctions, repairs falling outside our warranty terms. Due to further developments of the PRAKTICA B 200, minor deviations in these operating instructions may occur.
This text has been translated automatically from Dutch
Click here for the original text
Met de PRAKTICA B 200 bent u in het bezit gekomen van een kwalitatief hoogwaardige compacte kleingeldspiegelreflexcamera waarvan de sluitertijden over een bereik van 1/1000 s t/m 40 s volautomatisch worden gestuurd. De micro-elektronica van de camera maakt het bovendien mogelijk met vaste belichtingstijden tussen 1/1000 s en 1 s en in de stand "B" met willekeurig lange sluitertijden te werken. De lichtmeting geschiedt, door elektronische overbrenging van de diafragmawaarde van objectief naar camerahuis, bij volle lensopening en dus bij een optimaal helder zoekerbeeld. 16 Lichtdioden (LED's) langs de rand van het zoekerbeeld informeren u omtrent alle belangrijke opnamegegevens en -functies, zoals bijvoorbeeld de te verwachten sluitertijd, grenswaarden en vol- respectievelijk halfautomatische belichtingsregeling. Tevens is onderaan in het zoekerbeeld het gekozen diafragma zichtbaar. Voor bewust over- of onderbelichten kan de automaat met de hand worden gecorrigeerd. De PRAKTICA B 200 is voorzien van een PRAKTICA-bajonetvatting die snel en zeker wisselen van objectieven waarborgt.
Technische eigenschappen
Automatische spiegelreflexcamera met beeldformaat 24 mm x 36 mm; lichtmeting bij volle lensopening door elektronische overbrenging van de diafragmawaarde.
Elektronisch gestuurde, tussen 1/1000 s en 40 s traploos ingestelde sluitertijd.
Omschakelbaar van volautomatisch op halfautomatisch met vaste sluitertijden van 1/1000 s tot 1 S.
Sluitertijden indicatie in de zoeker door middel van lichtdioden.
Indicatie bij onder- respectievelijk overbelichting.
Ingesteld diafragma ingespiegeld in de onderrand van het zoekerbeeld.
Automatisch ingesteld diafragma over een bereik van ± 2 lichtwaarden met de hand te corrigeren..
Belichtingsgeheugen.
Scherpstellen op fresnellens met nieuw type drievoudige instelwig, microraster en matglas.
Afmetingen zoekerbeeld: 95% van het beeldformaat.
Synchronisatietijd elektronenflitser 1/90 s (mechanisch gestuurd).
PRAKTICA-bajonetvatting (oplegmaat 44,4 mm; binnenmaat 48 mm).
Aansluiting voor motordrive.
Memohouder op camera-achterwand.
Batterijtest in de zoeker.
Energiebron 6V zilveroxide batterij (bijv. Mallory PX 28).
Gallium-Arsenide-Fosfide fotodiode als lichtgevoelige cel.
Lichtmeetbereik: 0 - 17 EV bij 21 DIN en diafragma 1,4.
Afmetingen camerahuis: 138 mm x 87,5 mm x 49 mm.
Gewicht (camerahuis zonder batterij): 530 g.
Zelfontspanner (vertraging ca. 8 s) met spanhendel.
Benaming van de onderdelen
1 Instelring voor filmgevoeligheid
2 Terugspoelknop
3 Terugspoelhendel
4 Venster voor het inspiegelen van de diafragmawaarde
5 Filmtransporthendel
6 Beeldteller
7 Scherptediepte-controleknop
8 Spanhendel voor zelfontspanner
9 Ontspanknop voor zelfontspanner
10 Deblokkeerknop
11 Filterschroefdraad
12 Diafragmaring
13 Flitscontact
14 Instelknop voor belichtingscorrectie met instelteken
15 Deblokkeerknop voor correctieknop
16 Knop voor batterijtest en voor het vasthouden van de lichtmeetwaarde
17 Middencontact
18 Flitsschoen
19 Instelknop vaste sluitertijden en "automatiek" met instelteken
20 Ontspanner
21 Aansluiting voor draadontspanner
22 Ontspanvergrendeling met instelteken
23 Oog voor draagriem
24 Justeerteken voor wisselen van objectief
25 Scherptediepteschaal
26 Afstandring
27 Oculair met vatting voor accessoires
28 Sluiter
29 Filmcassette compartiment
30 Filmtransportrol
31 Filmopwikkelspoel
32 Kartelwieltje
33 Achterwand
34 Vergrendelknop voor batterijcompartiment
35 Deksel batterijcompartiment
36 Kontakten voor motordrive
37 Justering voor motordrive
38 Koppeling voor motordrive
39 Deblokkeerknop voor terugspoelen film
40 Statiefschroefdraad
41 Memohouder
42 Afdekkapje voor oculair (zie Blz. 40)
Beknopte gebruiksaanwijzing voor automatische belichtingsregeling
Deze beknopte gebruiksaanwijzing kan geenszins de vereiste kennis van alle in dit boekje gegeven aanwijzingen omtrent het gebruik ban de camera vervangen.
Batterij inzetten
Houd u hierbij aan de polariteittekens (+) en (-) aan de binnenzijde van het deksel (35) van het batterijcompartiment.
Film inleggen
Terugspoelknop (2) omhoog trekken; de camera-achterwand veert nu open.
Load the film
Instelknop (19) op "" of een korte, vaste sluitertijd instellen. Kleinbeeldcassette in het filmcompartiment (29) leggen. Terugspoelknop (2) weer omlaag drukken. Filmaanloopstrook voldoende ver in de sleuf (31) steken en de opwikkelspoel met het kartelwieltje (32) in de richting van het midden van de camera draaien tot de nokkenwieltjes in de filmperforatie grijpen. Filmtransporthendel (5) helemaal tot de aanslag omhalen om te controleren of de film werkelijk getransporteerd wordt.
Achterwand sluiten
Klaarmaken voor de opname
Beurtelings filmtransporthendel overhalen en ontspanner indrukken tot in de beeldteller (6) het getal "1" zichtbaar wordt.
Instelknop (19) weer op "automatiek" zetten
Filmgevoeligheid instellen
Instelring (1) omhoog trekken en zo draaien dat het gewenste getal tegenover het instelteken komt te staan.
Gewenste diafragma instellen
Met de diafragmaring (12) het gewenste diafragma instellen.
Scherpstellen
Drievoudige instelwig: De camera is scherpgesteld als contouren en lijnen van het onderwerp een natuurlijk verloop te zien geven.
Microraster: De juiste beeldscherpte is bereikt wanneer het beeld helder en vrij van lichtschitteringen zichtbaar is.
Matveld: Wordt gebruikt bij weinig licht (bijv. bij dichtbij-opnamen): het beeld moet helder en scherp zichtbaar zijn.
Ontspannen van de sluiter
Door de ontspanner (20) licht in te drukken wordt de automaat ingeschakeld; lichtdioden geven de sluitertijd aan. Past de sluitertijd bij het onderwerp, dan kan de ontspanner worden doorgedrukt; zo niet, dan moet een ander diafragma worden gekozen.
Film verwisselen
Deblokkeerknop (39) indrukken, terugspoelhendel (3) uitklappen en in de richting van de pijl draaien tot de weerstand wegvalt. Dit geeft aan dat het eind van de film is bereikt. Terugspoelknop (2) helemaal uittrekken (de achterwand opent zich) en de filmcassette uit de camera nemen.
Objectief verwisselen
Ontgrendelknop (10) indrukken en het objectief tot de aanslag tegen de wijzers van de klok in draaien en uit de vatting nemen. Het andere objectief zo tegen het camerahuis drukken dot de rode markeringen tegenover elkaar staan, en met de wijzers van de klok mee draaien tot het op zijn plaats vastklikt.
Batterij inzetten
Voor de stroomvoorziening voor de belichtingsmeter, computersturing en lichtdioden wordt een zilveroxide batterij - Mallory PX 28 of een vergelijkbaar type - met een nominale spanning van 6 V gebruikt. Een nieuwe batterij gaat bij normaal gebruik ca. 2 jaar mee. Voor het inzetten van de batterij de vergrendelknop (34) van het deksel van het batterijcompartiment (35) tegen de wijzers van de klok in draaien tot het deksel geopend kan worden. Kontakten in het batterijcompartiment en van de nieuwe batterij met een droge doek schoon wrijven. Batterij met de pluspool tegen de contactveer leggen (let op de polariteittekens aan de binnenzijde van het deksel) en in het batterijcompartiment laten kantelen. Deksel dicht drukken en met de vergrendelknop sluiten.
Batterijtest
De sluiter moet gespannen zijn. Ontspanknop (20) en batterij-testknop (16) indrukken. Als de lichtdioden goed zichtbaar zijn bezit de batterij nog voldoende spanning. Bij uitgeputte batterij lichten de lichtdioden bijna of geheel niet op. In de stand "B" en flitsopname ""is geen batterijtest mogelijk.
Bijzonder aandacht dient besteed te worden aan de batterij en de daarbij behorende contactpunten. Deze moeten regelmatig nagekeken worden en eventueel gereinigd worden. De batterij is gevoelig voor zeer lage temperatuur en moet daartegen zonodig beschermd worden. Wordt de camera langere tijd achtereen niet gebruikt, neem de batterij er dan uit.
Film inleggen
Let op! Voordat de film in de camera wordt gelegd moet de sluitertijdenknop (19) op flits opname "" (ca. 1/90 s) worden ingesteld omdat in de stand "automatiek" lange belichtingstijden kunnen ontstaan. De transporthendel kan niet eerder worden overgehaald tot de sluiter ontspannen is. Forceer hierbij niets. Zonodig kan een lange sluitertijd worden afgebroken door van "automatiek" op "B" om te schakelen.
Achterwand openen
Terugspoelknop (2) helemaal uittrekken zodat de achterwand open springt. Achterwand helemaal open klappen, de beeldteller (6) springt hierbij automatisch op nul. Cassette In het cassettecompartiment (29) leggen, terugspoelknop (2) weer helemaal naar binnen drukken en daarbij zonodig iets verdraaien.
Aanloopstrook van de film minstens 1 cm in de sleuf van de filmopwikkelspoel (31) steken. Vervolgens de opwikkelspoel aan het kartelwieltje (32) ongeveer een hele slag in de richting van het midden van de camera draaien. De tanden van de filmtransportrol (30) moeten daarbij in de filmperforatie grijpen. Door voorzichtig overhalen van de transporthendel (5) controleren of de film goed door de opwikkelspoel wordt "gepakt".
Achterwand sluiten
Achterwand in het midden van de sluiting vast pakken en tegen het camerahuis drukken tot de sluiting hoorbaar dichtklikt.
Klaar maken voor opname
De transporthendel (5) kan zonder de film te transporteren in een vrije stand worden gezet. Deze paraatstand zorgt bij snel achter elkaar fotograferen voor een betere handligging. Transporthendel helemaal tot de aanslag omhalen, in de uitgangsstand terugbrengen en daarna de sluiter met de ontspanner (20) ontspannen. Handeling herhalen tot de automatische beeldteller (6) het cijfer "1" te zien geeft.
Instellen filmgevoeligheid
Instelring voor de filmgevoeligheid (1) omhoog trekken en zo draaien tot de gewenste DIN/ASA-waarde tegenover het overeenkomstige instelteken komt te staan. Bij het loslaten klikt de ring weer in. Als extra geheugensteuntje over het soort van de ingelegde film kunt u het afgescheurde dekseltje van het filmdoosje in de memohouder (41) schuiven.
Automatische belichtingsregeling
De PRAKTICA B 200 werkt in de stand "automatiek" automatisch en met een tussen 1/1000 s en 40 s traploos ingestelde sluitertijd. De benodigde sluitertijd wordt elektronisch aan de hond van de lichtverhoudingen, het voorgekozen diafragma en de filmgevoeligheid bepaald.
Lichtdioden langs de rand van het zoekerbeeld geven de automatisch gekozen sluitertijd aan. Eventuele over- of onderbelichting wordt eveneens aangegeven (OVER/UNDER). Doordat het licht door de lens gemeten wordt, wordt met factoren die de belichting beïnvloeden zoals brandpuntsafstand van het objectief, filters, brandpuntsverlengende accessoires enz. automatisch rekening gehouden.
Bij gebruik van objectieven met PRAKTICA-draad (M 42 x 1) door middel van een adapter geschiedt de lichtmeting bij werkdiafragma.
Diafragmavoorkeuze
Door verdraaien van de diafragmaring (12) wordt de gewenste diafragmawaarde tegenover het instelteken op de objectiefvatting gezet. De ingestelde diafragmawaarde wordt onder in het zoekerbeeld weergegeven. Als richtlijn voor het te gebruiken diafragma kon bij een film met een gevoeligheid van 20 DIN/80 ASA de volgende waarde gehanteerd worden:
Diafragma
Zon 8 - 11
Bewolkt 4 - 5.6
Close-ups niet kleiner dan 8
Het diafragma kan ook aan de hond van de gewenste scherptediepte van het onderwerp (voorgrond, tussen bereik, achtergrond) worden bepaald waarbij op de in de zoeker aangegeven sluitertijd moet worden gelet in verband met bewegingsgevaar van de camera. Zie hiervoor ook het hoofdstuk "scherptediepte". Een grote diafragmawaarde levert een grote scherptediepte, een kleine diafragmawaarde een dienovereenkomstig kleinere scherptediepte.
Automatische belichtingindicatie
Sluitertijdenknop (19) op "automatic" draaien. Door licht indrukken van de ontspanner (20) wordt de elektronica ingeschakeld.
In de zoeker kan de door de automaat gekozen sluitertijd naast een oplichtende lichtdiode worden afgelezen. Mocht de door de automaat gekozen sluitertijd niet in overeenstemming met het motief blijken, dan kon dat door een andere diafragmawaarde te kiezen worden gecorrigeerd. Daarvoor is voor alle normale tijden over het bereik van 1/1000 s . . . 8 s een lichtdiode aanwezig; tussenliggende waarden van de traploze instelling worden door gelijktijdig oplichten van twee aangrenzende dioden aangegeven.
Sluitertijden tussen 8 s en 40 s worden aangegeven door een constant brandende lichtdiode naast "UNDER". Het onderschrijden van de waarde 1/1000 s resp. het overschrijden van 40 s wordt aangegeven door een knipperde lichtdiode naast "OVER" respectievelijk, "UNDER". In deze gevallen worden de sluiter steeds met 1/1000 s resp. 40 s gestuurd. Bij sluitertijden van 1/15 s en langer verdient het gebruik van een statief aanbeveling.
Ontspannen van de sluiter
Na controle van de sluitertijd in de zoeker kan door verder doordrukken van de ontspanner (20) de sluiter ontsponnen worden. Bij het loslaten van de ontspanner wordt de elektronica automatisch uitgeschakeld. Loslaten van de ontspanner tijdens langere sluitertijden heeft geen invloed op de belichting. De automaat wordt in dat geval pas uitgeschakeld als de sluitertijd volledig verstreken is.
Moet bij een zeer lange sluitertijd het aflopen van de sluiter vroegtijdig onderbreken worden (bijvoorbeeld na abusievelijk ontspannen van de sluiter), dan kan de sluitertijdenknop (19) kortstondig op "B" worden gezet. Heeft men bij automatische belichtingsregeling het oog niet achter de zoeker (bijvoorbeeld bij opnamen vanaf een statief) dan moet de bij de camera meegeleverde oculairdop (42) op de vatting van het oculair (27) worden geschoven.
Geheugen van de belichtingsautomaat
Is het onderwerp bijzonder contrastrijk, zoals
donker geklede personen in zonbeschenen sneeuw, of
lichte onderwerpen tegen een donkere achtergrond,
dan moet de belichtingswaarde door een individuele lichtmeting aan de belangrijkste beeldelementen van dichtbij worden bepaald. De bij deze dichtbijmeting verkregen meetwaarde wordt onthouden en de beeldcompositie kan dan gewijzigd worden zonder dat de belichting verandert.
Om de meetwaarde te onthouden wordt de ontspanner (20) licht ingedrukt (lichtmeting) en daarbij kortstondig de memorieknop (16) ingedrukt (onthouden meetwaarde). De sluiter moet daarbij gespannen zijn! Daarna vindt er tot het ontspannen van de sluiter verder geen nieuwe meting meer plaats; de sluiter kiest een sluitertijd overeenkomstig de in het geheugen opgeslagen belichtingswaarde.
Door het loslaten van de ontspanner, waarbij de elektronica wordt uitgeschakeld, wordt de opgeslagen meetwaarde weer gewist.
Correctie
Een andere mogelijkheid om de belichting individueel te beïnvloeden biedt de instelknop voor de belichtingscorrectie (14). Dergelijke correcties zijn noodzakelijk bij opnamen met een hoog contrast, bijvoorbeeld bij donkere voorwerpen voor een lichte achtergrond (+1; +2) of bij lichte voorwerpen voor een zeer donkere achtergrond (-1; -2).
Daartoe wordt de deblokkeerknop (15) ingedrukt en knop (14) in de gewenste stond gedraaid. Uitgaande van de basismeting wordt bij het instellen op +1 resp. +2 de sluitertijd met 1 respectievelijk 2 belichtingswaarden verlengd. Op soortgelijke wijze vindt ar een verkorting plaats bij het instellen op -1 respectievelijk op -2. De correctieknop is in halve waarden instelbaar. Aan de grenzen van het filmgevoeligheidsbereik - 12 DIN en 36 DIN - is eveneens een correctie met 2 stappen mogelijk (wat dan overeenkomt met 6 DIN resp. 42 DIN).
Een uitbreiding van het sluitertijden bereik tot voorbij de waarden 1/1000 s en 40 s is met de correctieknop niet mogelijk.
Let op! Na een dergelijke correctie moet de knop weer in de uitgangspositie (O-stand) worden teruggezet.
Vaste sluitertijden
De PRAKTICA B 200 is omschakelbaar op vaste sluitertijden zodat u bijvoorbeeld bij reproductiewerk, technisch-wetenschappelijke opnamen enz. met vaste sluitertijden kunt werken. Daarbij heeft u dan de beschikking over vaste sluitertijden van 1 s t/m 1/1000 s en in de stand "B" over willekeurig lange sluitertijden. Met de sluitertijdenknop (19) kan de gewenste tijd tevoren worden ingesteld.
De camera wordt daarmee gelijktijdig op halfautomatisch omgeschakeld. Evenals bij automatische belichting wordt door een lichte druk op de ontspanner de elektronica van de camera ingeschakeld. Ook is belichtingscontrole met behulp van de lichtdioden in de zoeker mogelijk. In dit geval knippert de bij de ingestelde sluitertijd behorende lichtdiode terwijl een andere tegelijkertijd de overeenkomstig de lichtomstandigheden, filmgevoeligheid en gekozen diafragma optimale sluitertijd door constant branden aangeeft. (Bij tussenliggende woorden lichten twee naast elkaar gelegen lichtdioden op.) De camera wordt nu ingesteld door diafragma of sluitertijd zo te veranderen dat de knipperende lichtdiode (LED) in de zoeker zich naar de constant brandende lichtdiode verplaatst om, zodra de juiste instelling is bereikt, geheel te verdwijnen. Bij instelling op het flitssymbool ""en "B" wordt geen LED-indicatie gegeven. Wordt een sluitertijd van 1/15 s of langer gekozen, dan is een statief een vereiste.
De flitstijd (1/90 s) wordt mechanisch, alle andere sluitertijden inclusief "B", elektronisch gestuurd. D.w.z. fotograferen zonder batterij in de camera is, behalve op de flitstijd, niet mogelijk. Het automatisch diafragma van de objectieven blijft echter altijd werken.
Vasthouden van de camera
TNevenstaande afbeeldingen tonen de verschillende manieren om de camera bij het fotograferen met verticaal en horizontaal formaat vast te houden. Houd de camera rustig en stevig vast en steun de ellebogen tegen het lichaam. Op deze wijze bereikt u trillingsvrije opname.
Flitsopnamen
Het gebruik van een flitser verdient aanbeveling als het beschikbare licht (bijv. binnenshuis) onvoldoende is om zeker en uit de hond te kunnen fotograferen of als het onderwerp extra "opgehelderd" moet worden. Alle soorten elektronenflitsers zijn bruikbaar. Flitser in het flitsschoentje (18) schuiven, de elektrische verbinding kamt daarbij automatisch tot stand (middencontact).
Flitsers zonder middencontact worden op het flitscontact (13) voor op het camerahuls aangesloten. Het gelijktijdige gebruik van twee flitsers is mogelijk doordat de beide aansluitingen (middencontact en flitscontact) elektronisch volledig van elkaar gescheiden zijn. Voor elektronenflitsers de sluitertijdenknop (19) instellen op "". De benodigde sluitertijd (ca. 1/90 s) komt daarbij langs mechanische weg tot stond. Ook kunnen sluitertijden langer dan 1/125 s worden ingesteld.
De diafragma-instelling is afhankelijk van het richtgetal (voor een gegeven filmgevoeligheid) van uw flitser en de afstand.
Wisselen van de objectieven
Ontgrendelknop (10) indrukken en het objectief tegen de wijzers van de klok in tot de aanslag verdraaien. Objectief uit de camera nemen.
Objectief zo in de camera zetten dot de rode markeringen (24/10) op objectief en camera tegenover elkaar staan.
Objectief tegen het camerahuis drukken en met de wijzers van de klok mee draaien tot de vergrendeling hoorbaar vastklikt.
Met behulp van de PRAKTICA-adapter kunnen alle originele PRAKTICA-objectieven met M 42 x 1 schroefdraad worden gebruikt. Objectieven van ander fabrikant met schroefdraad M 42 x 1 moeten geschikt zijn voor PRAKTICA-camera's en voor meting bij werkdiafragma. De PRAKTICA B 200 werkt ook in combinatie met schroefdraad objectieven zonder enige beperking volautomatisch. Alleen de lichtmeting geschiedt bij werkdiafragma.
Scherpstellen
Scherpstellen is mogelijk op een drievoudige instelwig, een microraster of het matglas.
Drievoudige instelwig (1)
Met deze instelwig kan de beeldscherpte zeer nauwkeurig worden ingesteld. Het beeld is optimaal scherp als contouren en lijnen hun natuurlijk verloop volgen. Bij onscherpte is een duidelijke verschuiving daarvan zichtbaar.
Microraster (2)
De juiste beeldscherpte is ingesteld wanneer het beeld binnen dit raster duidelijk, rustig en zonder lichtschitteringen zichtbaar is.
Matglas (3)
Bijzonder gunstig bij loupe- en micro-opnamen als mede bij objectieven met relatief geringe lichtsterkte (diafragmawaarde groter dan 4). Het beeld moet helder en duidelijk op het matglas verschijnen.
Scherptediepteschaal
De grenzen van het scherptedieptebereik bij de verschillende diafragmawaarden kunnen van de scherptediepteschaal (25) van het objectief worden afgelezen:
Voorbeeld:
Afstand: 3 m
Diafragmagetal: 8
Scherptediepte: loopt van ca. 2m tot 5 m
Infrarood opnamen
Bij infrarood opnamen is een geringe correctie van de scherpstelling noodzakelijk, de bij het scherpstellen gevonden afstandwaarde tegenover het infrarood-instelteken (zie pijl) op het objectief draaien.
Scherptedieptecontrole
De scherptediepte kan ook in de zoeker beoordeeld worden. Daartoe wordt de scherptediepte controleknop naar boven geschoven. Hierbij mag geen lichtmeting uitgevoerd of de sluiter ontspannen worden omdat anders een foutieve belichting kan optreden.
Ontspanner
Voor een eenvoudige bediening zijn in de ontspanner (20) meerdere functies ondergebracht. Door de ontspanner tot het drukpunt licht in te drukken wordt de elektronica ingeschakeld. Door de ontspanner verder in te drukken wordt de sluiter ontspannen. Om onnodig stroomverbruik door per ongeluk inschakelen van de elektronica en ongewild ontspannen van de sluiter te voorkomen doet u er goed aan de ontspanner te vergrendelen voordat u de camera in de paraat- of combitas opbergt.
Vergrendelen van de ontspanner
Door de rond de ontspanner aangebrachte ring (22) met de wijzers van de klok mee te draaien kan deze vergrendeld worden. Om de ontspanner te ontgrendelen wordt de ring tegen de wijzers van de klok ingedraaid.
Let op! Ontspanner nooit in ingedrukte toestand vergrendelen.
Zelfontspanner
Sluiter spannen, spanhendel (8) van de zelfontspanner tot de aanslag naar beneden draaien en door indrukken van de ontspanknop (9) in het draaipunt van de hendel de zelfontspanner starten. Looptijd ca. 8 s.
Tijdens het aflopen van de zelfontspanner de sluiter niet spannen! Bij automatisch bedrijf oculair met de oculairdop afdekken om foutieve lichtmeting te voorkomen.
Film verwisselen
De beeldteller (6) geeft het aantal belichte beelden van de film aan. Is de film overeenkomstig het aantal beelden van de film belicht (rode merktekens bij 20 resp. 36), dan moet de film worden verwisseld.
Deblokkeerknop (39) zo ver indrukken dat hij vastklikt. Terugspoelhendel (3) uitklappen om, niet te snel, in de richting van de pijl (met de wijzers van de klok mee) draaien tot de toenemende weerstond gevolgd door zeer licht draaien van de handel het eind van de film aangeeft.
Terugspoelknop helemaal naar buiten trekken. De achterwand klikt nu open. De filmcassette uit de camera nemen. Nooit in het volle zonlicht van film verwisselen.
Let op! Zijn op de film meer opnamen gemaakt don de verpakking aangeeft, dan kan het voorkomen dat de transporthendel niet meer helemaal uitgeklapt kon worden. Forceer dan verder niets, maar spoel de film terug.
Onderhoud van de camera
Gebruik voor het reinigen van de camera nooit organische oplosmiddelen zoals bijv. spiritus lakverdunner enz. U dient de camera tegen stoten, stof en vuil te beschermen. Filmcompartiment, filmkanaal en achterwand van tijd tot tijd met een zacht penseel reinigen. Vooral niet tegen de sluiterlamellen drukken of de sluiterlamellen met de vingers aanraken. De spiegel slechts in uiterste gevallen zeer voorzichtig met een penseel afstoffen. In het bereik van 40 °C tot -10 °C werkt de camera zonder problemen. Buiten dit bereik kunnen door verschillende oorzaken in de mechanische en de elektrische/elektronische funkties afwijkingen optreden.
Plotselinge temperatuurwisseling kan condensvorming tot gevolg hebben wat wederom tot corrosieschade kan leiden.
Wij verzoeken u alle in deze gebruiksaanwijzing gegeven aanwijzingen nauwkeurig op te volgen. Ondeskundig gebruik van de camera kon defecten tot gevolg hebben waarvan de reparaties buiten onze garantiebepalingen vallen. Door verdere ontwikkelingen van de PRAKTICA B 200 kunnen geringe afwijkingen in deze gebruiksaanwijzing voorkomen.